|
|
Post by itsakeeper on Jul 26, 2009 8:43:30 GMT -4
|
|
|
|
Post by Blaisun on Aug 14, 2009 7:16:07 GMT -4
|
|
Creepy
Administrator  Dartmouth
Posts: 18,718
|
Post by Creepy on Sept 21, 2009 19:26:56 GMT -4
This is the Mitchell Ondemand testing procedure for the cam position sensor ( test results indicated in red):
Quote:CAMSHAFT POSITION (CMP) SENSOR
1.DO NOT disconnect distributor connector. Using an analog voltmeter, connect positive voltmeter lead to CMP sensor signal circuit (Tan/Yellow wire on Cherokee; Gray/Black wire on Grand Cherokee) at distributor wiring harness connector. Connect negative voltmeter lead to ground circuit (Black/Light Blue wire) at distributor wiring harness connector. Set voltmeter to 15-volt DC scale.
2.With distributor cap removed, manually rotate crankshaft until pulse ring enters sync signal generator on CMP sensor. Distributor rotor should be at about 11 o'clock position. Turn ignition on. If voltage is about 5 volts, go to step 8). If voltage is not about 5 volts, check voltmeter leads for good connections. [glow=red,2,300]The voltage was at 5 volts here, so I skipped to step 8 as indicated. [/glow]
3.Repair connections as necessary and repeat step 2). If connections are okay and voltage is still not about 5 volts, check voltage at supply circuit (Violet/White wire on Cherokee; White/Black wire on Grand Cherokee) at CMP sensor harness connector. If voltage is present, replace CMP sensor. If voltage is not present, go to next step.
4.Backprobe PCM connector and measure voltage between terminal A17 (Violet/White wire on Cherokee; White/Black wire on Grand Cherokee) and ground. PCM is located on right side of engine compartment. If no voltage is present, see appropriate CMP sensor circuit tests in G - TESTS W/CODES - 4.0L 6-CYL article. If voltage is present, go to next step.
5.Check continuity of supply circuit (Violet/White wire on Cherokee; White/Black wire on Grand Cherokee) between distributor connector and PCM. If no continuity exists, repair wiring harness as necessary. If continuity exists, go to next step.
6.Check continuity of CMP sensor signal wire (Tan/Yellow wire on Cherokee; Gray/Black wire on Grand Cherokee) between distributor connector and terminal A18 at PCM connector. If no continuity exists, repair wiring harness as necessary. If continuity exists, go to next step.
7.Check continuity between ground and Black/Light Blue wire at distributor connector. If no continuity exists, repair wiring harness as necessary. If continuity exists, go to next step.
8.Observe voltmeter and crank engine. Voltmeter needle should fluctuate from 0-5 volts. If voltage is as specified, CMP sensor is operating properly and sync pulse signal is being generated. If voltage is not as specified, replace CMP sensor. [glow=red,2,300]The voltage switched between 0 and 5 volts as specified, so the CMP tested OK. [/glow]
As for the crankshaft position sensor, here's Mitchell's advice:
Quote:CRANKSHAFT POSITION (CKP) SENSOR
Disconnect CKP sensor connector. CKP sensor is mounted in left side of transmission bellhousing. Measure resistance between terminals "B" and "C" at CKP sensor connector. See Fig. 1 (I would post the graphic that shows the pinouts but don't see how to add images to this post). Replace sensor if any resistance exists. [glow=red,2,300]My sensor shows no continuity, which I would think would be what Mitchell meant by not showing any resistance
[/glow]
|
|
The Garagemahal
Moderator  Build Thread King
Resident Army Ranger , Navy Seal , Super-Warrior , Ninja !!
Build Thread King
Resident Army Ranger , Navy Seal , Super-Warrior , Ninja !!
Posts: 11,518
|
Post by The Garagemahal on Oct 11, 2009 14:35:07 GMT -4
Ford Xploder ,Ranger Door codes for axle gear id
Ranger
72 Regular 2200 3.08
74 Regular 2200 3.45
82 Regular 2700 3.08
84 Regular 2700 3.45
85 Regular 2750 3.55
86 Regular 2700 3.73
87 Regular 2700 4.10
96 Regular 3200 3.73
F4 Limited Slip 2700 3.45
F5 Limited Slip 2750 3.55
F6 Limited Slip 2700 3.73
F7 Limited Slip 2700 4.10
K6 Limited Slip 3200 4.10
Explorer
43 Open 3200 3.08
41 Open 3200 3.27
42 Open 4.10
46 Open 3.73
45 Open 3200 3.55
D4 Limited Slip 3200 3.73
D2 Limited Slip 4.10
L73 Limited Slip 3.73
|
|
johnnybebad
Jeeper
 DRIVE it like you STOLE it
Posts: 948
|
Post by johnnybebad on Oct 29, 2009 19:39:33 GMT -4
|
|
bill richards
Jeeper
Millwood Marauder
mud re-freshener
Posts: 4,169
|
Post by bill richards on Nov 6, 2009 12:16:13 GMT -4
|
|
The Garagemahal
Moderator
Build Thread King
Resident Army Ranger , Navy Seal , Super-Warrior , Ninja !!
Posts: 11,518
|
Post by The Garagemahal on Nov 24, 2009 22:04:03 GMT -4
Rough Country Trac bar , tierod end
Moog replacement part # is E514OR
Spicer part # is 269-2018
|
|
Sandboxcowboy
Jeeper
Oh yes, please tell me how deep that mud puddle was in beaver bank.....
Posts: 2,748
|
Post by Sandboxcowboy on Jan 15, 2010 21:03:43 GMT -4
Mentor tips and tricks over the years from fabricating patch panels to removing pilot bearings and heads........ more hot rod tech but stuff i have run into over the years. I like post 158 part 1...................... Setting up DANA rears; 1. To determine your pinion preload shim, take a piece of thin electrical solder and put it behind the front outer race. Tighten the pinion until you get the right amount of preload, then disassemble. Mike the flattened solder, that's the shim you'll need. www.jalopyjournal.com/forum/showthread.php?t=435410&highlight=gas+weldingJustin Have anything to add that you were taught or learned from the old timers back when u were bustin knuckles for no reason? Slip the box end of a wrench over the open end of "working wrench" to add leverage if u cant fit or find that ratchet for the job!!! |
|
The Garagemahal
Moderator
Build Thread King
Resident Army Ranger , Navy Seal , Super-Warrior , Ninja !!
Posts: 11,518
|
Post by The Garagemahal on Feb 18, 2010 10:22:44 GMT -4
|
|
The Garagemahal
Moderator
Build Thread King
Resident Army Ranger , Navy Seal , Super-Warrior , Ninja !!
Posts: 11,518
|
Post by The Garagemahal on Feb 26, 2010 18:12:23 GMT -4
|
|
Sandboxcowboy
Jeeper
Oh yes, please tell me how deep that mud puddle was in beaver bank.....
Posts: 2,748
|
Post by Sandboxcowboy on Mar 14, 2010 15:09:25 GMT -4
Chrysler type Ignition cylinder replacement video No need to pull steering wheel like the older GM type!! |
|
Hawkes
Hardcore
 Lurker
Posts: 5,404
|
Post by Hawkes on Apr 28, 2010 11:47:44 GMT -4
|
|
'Roach
Elite
 InsurJeeper
...the man who decided to use torx on Jeeps should be beaten severely...
InsurJeeper
...the man who decided to use torx on Jeeps should be beaten severely...
Posts: 1,002,222
|
Post by 'Roach on Jul 5, 2010 18:43:30 GMT -4
Found in Toy section of Pirate, and no idea of accuracy, but one heck of a complete list: TJ Spring rate & general info: OEM TJ front tag #127ab is 125 lb/in and 17"free OEM XJ front springs is supposedly 147 lb/in rate. OEM ZJ with I6 is supposedly 190 lb/in rate front and rear. RE 4.5 ZJ coil are 240 lb/in. 22" tall unloaded RE 3.5" XJ coil 141 lbs/inch RE 4.5" XJ coil 169 lbs/inch RE 5.5" XJ coil 185 lbs/inch Rustys 3" XJ standard coil 150 lbs/inch Rustys 3" XJ Heavy Duty coil 180 lbs/inch Rustsy 4.5" XJ coil 150 lbs/inch 22” tall unloaded Rustsy 6.5" XJ coil 150 lbs/inch Rustys 9" XJ coil 180 lbs/inch OME 930 XJ coil 160 lbs/inch xj or zj I6 OME 934 ZJ coil 180 lbs/inch zj v8 Rancho 3" 235 lb/in rate. rockkrawler 6.5" are 165 lbs/in Sky Jacker 3" ZJ coils 218 lbs/in Pro-Comp 4" coils 150-155 lb/in :uncompressed length=19" Teraflex tj SR3T- Free length= 15" Spring rate= 190 rear Teraflex tj SR4T- Free length= 15.38" Spring rate= 210 rear Teraflex tj SF3T- Free length= 19.5" Spring rate= 170 front Teraflex tj SF4T- Free length= 20.25" Spring rate= 200 front 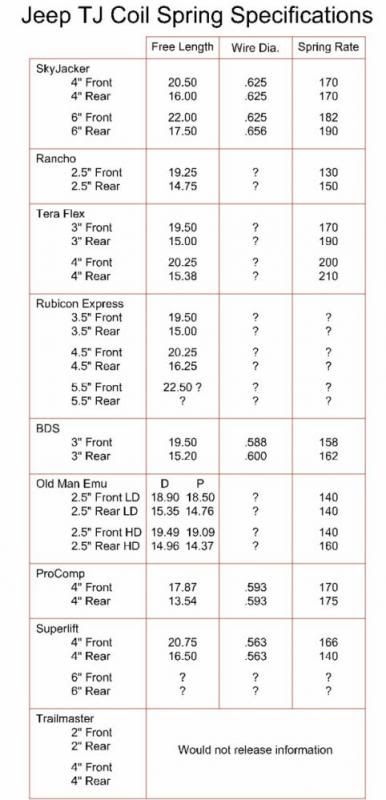 Attachments:
|
|
|
|
Post by Blaisun on Oct 23, 2010 15:21:41 GMT -4
|
|
Enos
Hardcore
Founding Member
Posts: 8,513 
|
Post by Enos on Nov 14, 2010 11:46:21 GMT -4
|
|